Windows we love you!
...but you have your little quirks.

Before you begin
You need two (2) network adapters
Your PC needs at least two adapters, because you're sharing the connection in one adapter with the other adapter connected to Squink.
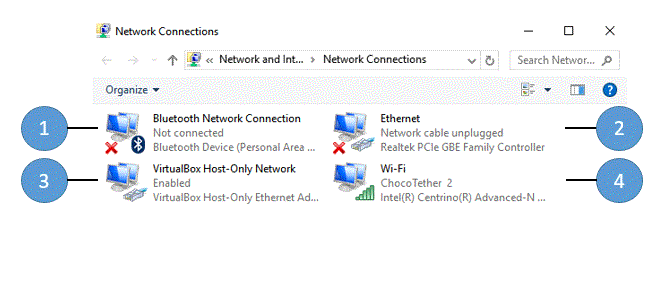
Most modern computers have two or more adapters by default. It can be one Ethernet adapter and one Wi-Fi, two Ethernet adapters or a mix of Ethernet, Wi-Fi and emulated adapters. Don't know what you have? Follow this procedure and you should see something similar to what is shown on the right:
- Press the "windows key" + r (simultaneously).
- Write "ncpa.cpl"
- Hit enter
- This will take you to the "Newtork Connections" screen
Clean the adapter's configuration
You've used your computer for several things before Squink came into your life. That's why it's absolutely important to verify that the adapter you're going to use to connect to Squink is clean and ready:
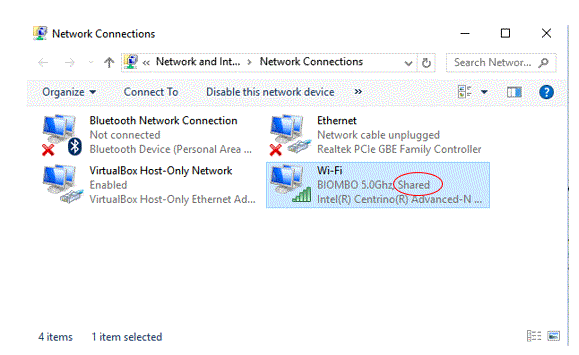
- Go the the "Network Connections" screen as shown in the previous step
- If there are any connections that are "shared":
- Right click on it
- Select properties
- Go to the "Sharing tab"
- Disable the "Allow other network users to connect through this computer's internet connection" checkbox
- Click Ok
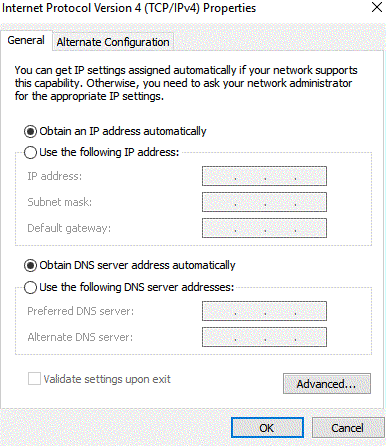
- Now, select the adapter you're going to use to connect to Squink (it's probably your main "Ethernet" connection), and follow this steps:
- Right click on it
- Select properties
- In the list of services, click on the one related to TCP/IPv4 and click properties
- If you have any values in the Preferred DNS and Alternate DNS fileds, clear them out (empty values).
- Select "Obtain IP address automatically"
- Select "Obtain DNS server address automatically"
- At the end, your settings should look like the picture on the right.
- Click Ok
- Turn Off your printer (keep it off. We'll tell you when to turn it on)
- Reboot your computer
Configure network Sharing
Now, share your connection
Now that the configuration is clean, you can share your connection.
- Go to the "Network Connections" screen
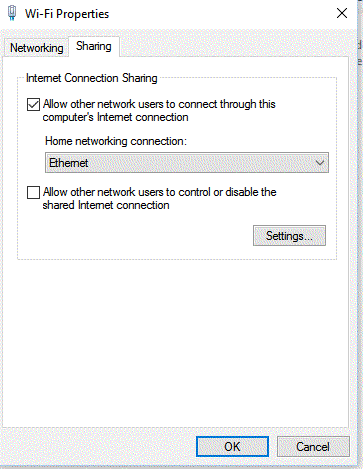
- Select the adapter that connects your computer to the internet (usually your Wi-Fi adapter). Follow these steps:
- Right click on it
- Select properties
- Go to the "Sharing" tab
- Enable the "Allow other network users to connect through this computer's internet connection" checkmark
- Make sure you select the adapter that will connect to the printer in the "Home network connection
- Click Ok
- Wait for the configuration to apply
- Connect Squink to your PC via the ethernet cable
- Turn on the printer
- Wait about 30 seconds, you should be ready to go.
Test your Connection
You should be seeing blinking LEDs (one green and one orange) on the PC's Ethernet port. If you don't see these LEDs the connection will not work. Try some of the following advices:
- Check the connection is firm in both ends (computer and squink)
- Try a different cable
- Turn the prnter off, and then on again
Now, everything should be ready for Squink to surf the net, but we need to make sure things are ready to go.
When Windows is sharing an internet connection it creates two things for us:
- A network domain: mshome.net. All devices that use the shared connection will become part of this domain
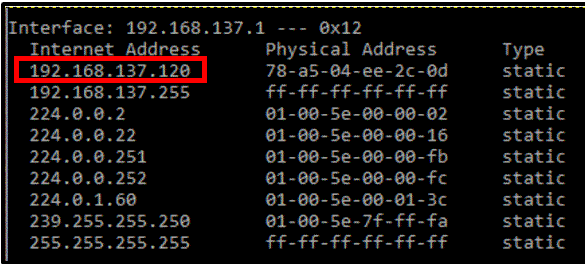
- An IP range: All addresses asigned by the internet sharing service in Windows will pertain to the range: 192.168.137.XXX
- Press "windows key" + r (simultaneously)
- Type "cmd"
- Hit enter
- In the console, type "arp -a" and hit enter
First connection to Squink
Use the IP address first
It's our experience that sometimes windows doesn't recognize the name "squink.mshome.net" right away. But most of the times you just want to connect to Squink to setup a network configuration then connect via wifi and remove the cable.
If your ARP run was successful (look at "test your connection" above) and you have an IP address, just jump to your browser and go to http://<Squink's IP address>.
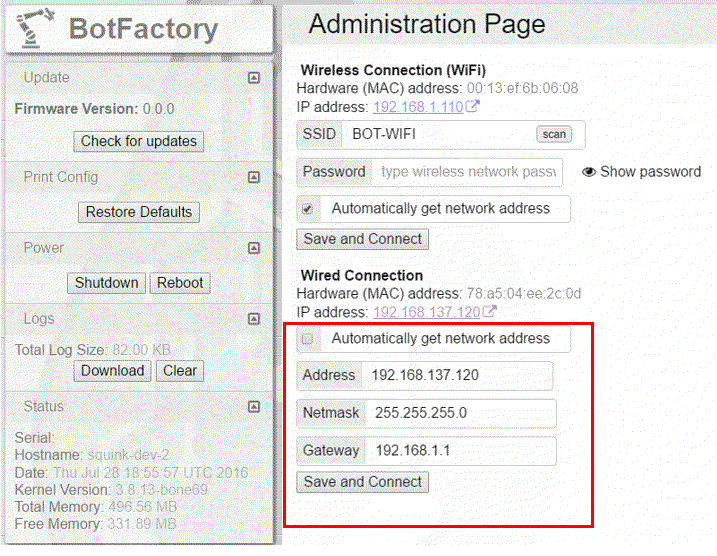
Once in the main page, read the license agreement, and accept it (if you agree to it). From the main page click the "Admin" button and you will land in the page shown on the right.
The first thing to do at the admin page is to update to the latest software version using the "check for updates" button on the left.
After you update, go back to the admin page and from there you can configure Squink's connections to the network at will.
Remember to uncheck "Automatically get network address" if you want to setup a fixed IP. Most users can leave that option checked.

Access using squink.mshome.net
After you have updated your printer, you'll be able to use "http://squink.mshome.net" in your browser to access Squink. Keep in mind that this only works if you're connected via direct Ethernet Cable Connection.
If you're connected via Wi-Fi or any other external connection you will need to use something like "http://squink.<your domain>". In most local networks created via a Wi-Fi router this address will be: "http://squink.local", or simply: "http://squink"
The last resort - Edit the windows registry
Sometimes the shared connection in windows get stuck. It can happen because of several reasons:
- The IP address 192.168.137.1 is taken or reserved by another program
- Some anti-virus softwares change the configuration and break the functionality for sharing connections
- The configuration files get corrupted
- There are virtual network cards. (VirtualBox and VMWare, I'm looking at you)
- etc.
- When running arp -a you don't see the network 192.168.137.1
- When runnign arp -a you see the network address 192.168.137.1, but there is no other IP address in the form 192.168.137.XXX ( x being a number between 0 and 9)
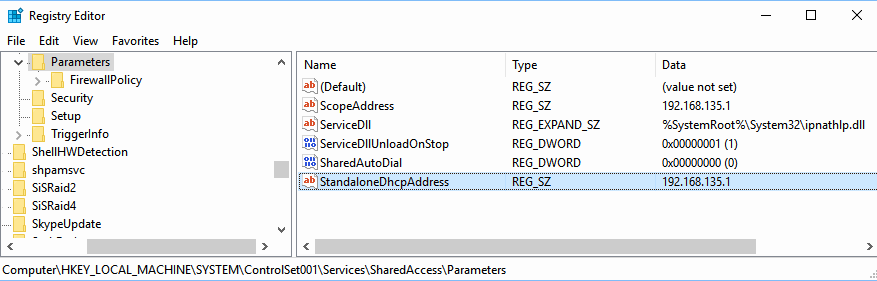
Editing the register
- Press "Windows Key" + "R". It will open the run command windows
- Run "regedit" and wait for it to open
- Travel the tree until you are at: "HKEY_LOCAL_MACHINE\SYSTEM\ControlSet001\Services\SharedAccess\Parameters"
- Change the value of ScopeAddress to 192.168.135.1
- Change the value of StandaloneDhcpAddress to 192.168.135.1
- Close regedit
- Disable network sharing
- Reboot your machine
- Enable network sharing
Other helpful resource
Using a router
This can be useful in different scenarios. For example:
- You only have one ethernet adapter in your computer and need to connect to Squink for the first time
- You have an existing network where cabling is the standard
- You prefer not to use Wi-Fi
- "http://squink.<your domain>"
- "http://squink"
"KaBooom!", nothing works, what can I do?
We've caused seen cases where Squink's network configuration goes so bad that you just can't connect to it. For example: you may accidentally set a static IP address when your network needs a dynamic IP. Or you may have it configured to connect to a Wi-Fi network that no longer exists.
Squink has a procedure that will reset it to it's original configuration, leaving it's Ethernet connection configured to get an IP address automatically using DHCP.
The process for factory reset can be found here.