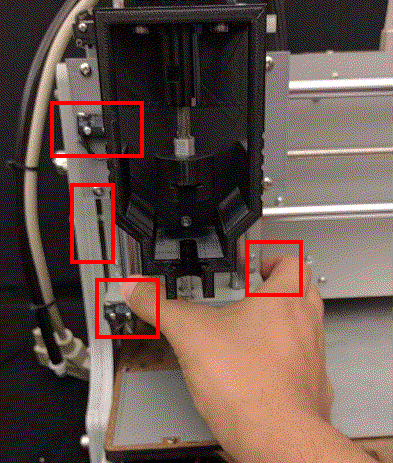
The factory reset allows you to reinstall the software running in the printer. We think of it as a last resource because it will clear all your configuration, but if you're ok with that, it's a safe process to follow.
The steps are:
- Turn off the printer
- Connect to the printer via Ethernet cable. Keep in mind the following conditions
- The printer willl need internet access.
- During factory reset the printer will request an IP address using DHCP. Static IP is not supported.
- Slowly move the head carrier left with your hand, or by turning the rod, to reach the left edge of the axis so that the left switch is pressed
- Slowly move the head carrier up with your hand, or by turning the rod, until you hit the top switch
- Place a head (any head) on the rail of the carrier. You don't need to connect it, just place it
- With one of your hands press both the right switch and the bottom switch on the head carrier
- Turn on the printer. (Without letting go the switches)
- Hold the switches down until the LED ring flashes green... then you can let go of the switches
During factory reset the LED ring will show the state of the process. Follow the following color code to understand what is happening:
- Fast Spinning WHITE: Entering factory reset
- Spinning YELLOW: Testing internet connection
- Steady RED: No internet connection found
- Spinning GREEN: Installing package
- Steady BLUE: Update done
A normal update will go like this: White --> Fast spinning white --> spinning green --> steady blue.
The following picture shows the switches that need to be pressed for the printer to enter factory reset:

