Hello, tech wizards! Ever been curious about the secret sauce behind coils, those indispensable elements in everything from radio frequency (RF) circuits to power electronics? Well, buckle up because we're about to take you on an electrifying ride! Here at BotFactory, we've been cooking up something truly groundbreaking: printing pancake coils with our SV2 Printer. And the cherry on top? Our inspiration comes from the trailblazing work of two phenomenal YouTube channels, IndoorGeek and Carl Bugeja. So, get ready to plug into the future of electronics!
The Pancake Coil: What's the Big Deal?
Understanding Pancake Coils
So, what exactly is a pancake coil? Unlike your traditional cylindrical coils, pancake coils boast a flat, spiral design. This unique structure not only saves space but also enhances heat dissipation. However, there's a catch: crafting these coils can be quite a challenge due to their intricate design and the precision required.
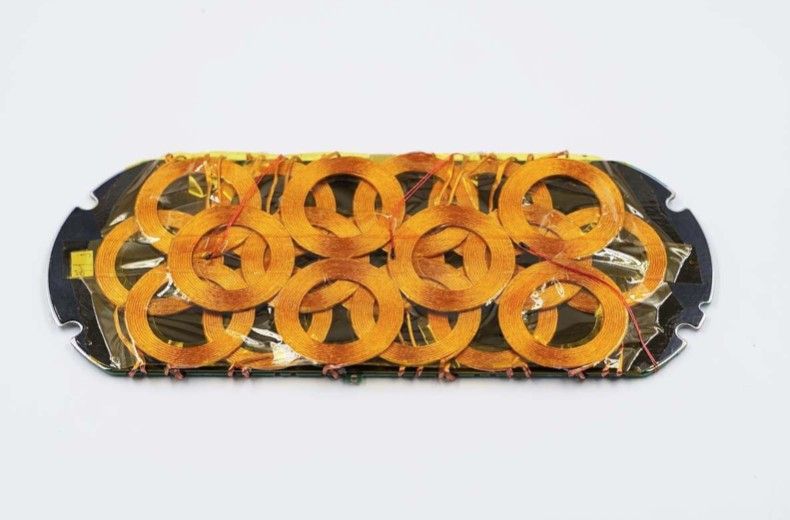
The Challenge of Building Pancake CoilsTake a look at the image on the right, which shows a wireless charger with 19 coils. These coils are arranged in a spiral pattern on the bottom of the charger. Constructing coils like these is an extremely complicated task, but the SV2 turns it into a piece of cake (no pun intended).


The SV2 Printer: Our Secret Weapon
Our SV2 Printer, known for its prowess in creating custom PCBs, is now flexing its muscles in the realm of pancake coils. The SV2 uses conductive and insulating inks to print layers on various substrates, letting you customize your coil materials. Plus, it can print double-sided and multi-layered designs, making the creation of intricate pancake coils a breeze.
The Design Process: It's All in the Details
To design our pancake coil, we turned to KiCad, a powerful tool that's great for intricate designs. Once we had our design, we loaded it into the SV2's software interface, which checked the print and conducted a Design Rule Check (DRC). Thanks to the printer's advanced capabilities, user-friendly operation, and rapid design iteration, we could accurately reproduce the design from the 3D file. The image on the right is a snippet from KiCad 7.0 and the design guidelines are taken from "Indoor"

Printing the Pancake Coil: Watch the Magic Happen
The printing process is where the real magic happens. It's a multi-step journey that requires precision, patience, and a keen eye for detail. Let's break it down:
Verification and DRC: Before we even start printing, the SV2's software interface comes into play. Once we load our design into the interface, it verifies the print and conducts its own Design Rule Check (DRC). This automated check helps identify any potential issues with the design that could affect the printing process or the performance of the final coil. It's an essential step that ensures our design is ready to be transformed into a physical object.


Layering and Curing: The first step involves printing the initial layer of conductive ink. This forms the base of our pancake coil. But it's not just a one-and-done deal. The SV2 printer makes multiple passes, laying down conductive ink layer by layer to build up the coil's structure. After each pass, we ensure the ink is properly cured for stability and durability. The SV2 printer's integrated heatbed supplies the controlled heat needed for this curing process.
Insulating Layers: Between each conductive layer, the SV2 prints an insulating layer. This prevents electrical shorting between the layers and helps maintain the coil's structural integrity. The insulating layers also play a crucial role in defining the coil's electrical properties, such as its inductance and resistance.
Vias: Vias are small holes that electrically connect different layers of the coil. They're essential for creating a multi-layered pancake coil. The SV2 printer can accurately place and fill these vias with conductive ink, ensuring a solid electrical connection between layers.
Final Curing and Inspection: After all layers have been printed and all vias have been filled, the entire coil undergoes a final curing process. This ensures that all layers are fully hardened and bonded together. We then inspect the coil to make sure it meets our quality standards.
The end result? A high-quality, intricate pancake coil that's ready to take on today's cutting-edge projects. This multi-layered, multi-pass process allows us to create coils with a level of complexity and precision that's hard to achieve with traditional manufacturing methods. It's just one of the many ways that the SV2 printer is revolutionizing electronics design and manufacturing.
The Bigger Picture: Additive Manufacturing and Beyond
Unleashing the power of the SV2 Printer to print pancake coils is like opening a treasure chest of opportunities in the world of electronics design and manufacturing. This game-changing technology could completely redefine how we design and produce coils, paving the way for more compact, efficient, and innovative electronic devices. But hold on, the excitement doesn't stop at coils!
Additive manufacturing processes, like 3D printing, have the potential to craft a broad spectrum of electronic components, from antennas to sensors. This means more design flexibility, less waste, and a big thumbs-up for our environment compared to traditional subtractive methods.
And as a treat for sticking with us through this electrifying journey, check out the mesmerizing GIF on your right. We're having a bit of fun with a neodymium magnet, flipping it back and forth, all thanks to the alternating current generated from powering the coil. It's just a small glimpse of the magic that's possible with our technology!

Let's Hear From You!
We're always excited to explore new design ideas and applications. So, if you have a design idea or a particular interest in mind, don't hesitate to share it with us. Who knows? Your idea might be the next big thing in electronics!
References
A big shout-out to IndoorGeek and Carl Bugeja on YouTube. Their innovative work in electronics has been a great source of inspiration for us.
