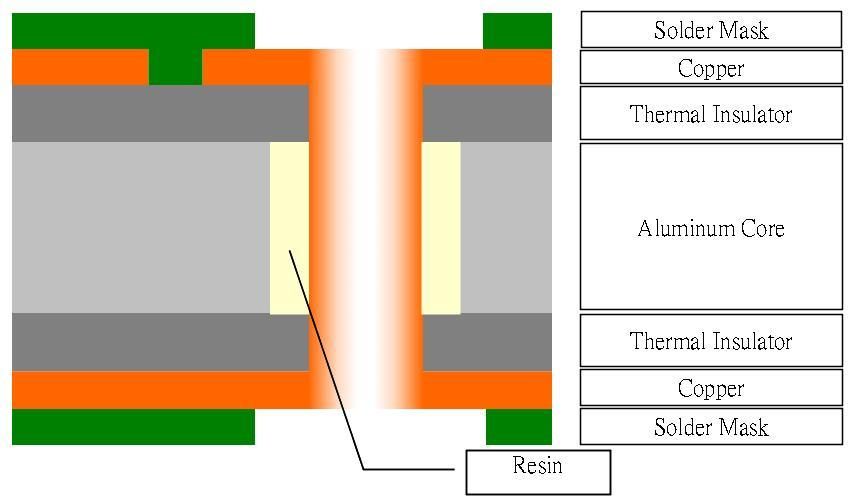
Metal Core PCBs (MCPCBs) are circuit boards that have a metal substrate instead of, or as a compliment to, epoxy or thin-film substrates. Their purpose is to draw thermal energy away from components and circuits generated by the operation of the device, acting as a heatsink and increasing the performance and lifespan of the components. Aluminum is the overwhelming choice for MCPCBs, although copper and steel are options as well. Typical uses for MCPCBs is lighting, motor control and power applications.
This blogpost was initiated by a sample request from a customer who kindly shared with us a design of a LED light strip they created. Bartenbach is a multidisciplinary firm in the lighting industry, with lighting planners, architects, a research department with people studying the multiple effects of lighting on human beings, a small workshop and a development department. Bartenbach designs optical components and systems for the lighting industry worldwide with strong focus on creating near glareless luminaires with exact lighting distributions, and they do this by directing the light very precisely by microfacetted lenses and reflectors. As Project Manager Roy Debbage noted, "In the process of developing these components and luminaires, we often need functional prototypes to test our designs or to present them to the customers. So there is where a pcb-printer would be very helpful."
Challenge
The tricky part about MCPCBs is that the core materials such as aluminum are soluable in the same chemicals used to etch copper, so the PCB manufacturer must take care to coat any exposed metal cores. In addition, vias and plated through-holes must be made thru the metal substrate, requiring more tooling (FR4 is softer) and refilling with an epoxy to insulate the core from the interconnection paths.
The overall cost and time-to-delivery can be higher, and there can be limits on the number of layers to one or two - four may be more expensive and time-intensive. However, with a Squink and SV2, creating a Metal Core PCB may be as fast and easy as making any board with FR4 or Kapton.

Choose your Metal Substrate
It is fairly straightforward to create a MCPCB with our PCB Printers. There are two ways to create them, however - coating them with a adhesive-backed Kapton or other insulator (conformal coating) OR printing and insulating layer. The first is fairly quick, so let's demonstrate that.
Here I have some adhesive-backed kapton (commonly found on the heatbeds of FDM 3D Printers), aluminum sheetmetal and copper plating. Regardless of your choice of metal substrate, it must be smooth and flat and thin enough that the surface is above 50C (so the ink can wet and cure properly).

Design for MCPCBs
Uploading the designs was fairly straightforward - Gerber is our preferred format. The design consisted of 10 mil (250 micron) traces across a single layer.

Printing MCPCB
For the highest conductance we printed two passes, cured the traces and then repeated the process. The pours on the design turned out to be an unnecessary waste of ink - we recommend avoiding pours unless absolutely needed.
As the Kapton covers the entire metal substrate there is no thermal sinking directly to it - there are other options for that too, however


Conclusions
After the second curing pass I cut the board down to size and measured conductivity along all the lines with resistances in line with our published specifications of 20 to 40 milliohm per square.
For a first pass (I had never done this before) this was extremely good - nothing failed. However, where there were bubbles or pockets of air trapped between the kapton and the metal substrate. Secondly the sheet metal had deformed when I had paired it down to size and did not have complete contact with the heatbed, so the surface was not as hot as it could be. The result was finished prints but as the pours did not completely wet on the surface, there is a notable 'mottled' discolouration that didn't affect conductivity but affected the aesthetic look.
As the Kapton covered the whole surface, the heatsinks were not connected to the metal core. However, it is possible to print an insulating layer instead of Kapton to leave openings for heat to flow from the components to the substrate.
